CentOS/Archived
CentOS 5.6 & ZoneMinder 1.25.0
This guide is for CentOS v5.6 (Notes for using this guide with CentOS 6 are in chapter 2.) with ZoneMinder v1.25.0 which are the newest released versions as of this update (Summer 2011). If you are attempting to install newer versions of either using this guide, you will have to adjust file and directory names denoted below.
Step One - Get CentOS
You can download the “.iso” file(s) for CentOS from http://www.centos.org/
Alternatively download the net-install version of CentOS which is basically just the first CD.
Here is one location to download the net-install version:
Download i386: http://mirror.symnds.com/distributions/CentOS-vault/5.6/isos/i386/CentOS-5.6-i386-netinstall.iso
Download 64 bit: http://mirror.symnds.com/distributions/CentOS-vault/5.6/isos/x86_64/CentOS-5.6-x86_64-netinstall.iso
Mirrors List: http://mirror.centos.org/centos/5/isos/
Step Two - Installation Source
Regardless of which method you use, the next few steps are the same.
Begin by booting your system up with either cd/dvd.
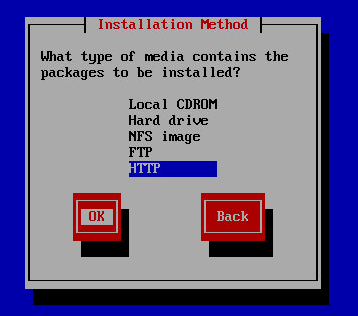
Choose the options that best fit your environment until you reach the “Installation Method”.
Choose HTTP ONLY if you are using the net-install method. Otherwise, you probably want to choose Local CDROM.
If you are using the net-install method then enter:
Website Name: mirror.centos.org
CentOS Directory: (for i386) /centos/5.6/os/i386
CentOS Directory: (for 64 bit) /centos/5.6/os/x86_64
Step Three - Installation Packages
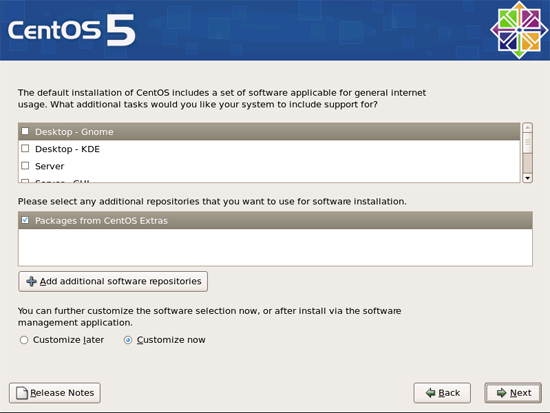
On the first screen, un-check "Desktop - Gnome" then check "Server" (not Server-GUI)
Make sure that you have "Customize now" selected at the bottom. (do not check "Packages from CentOS Extras")
Click "Next" to continue
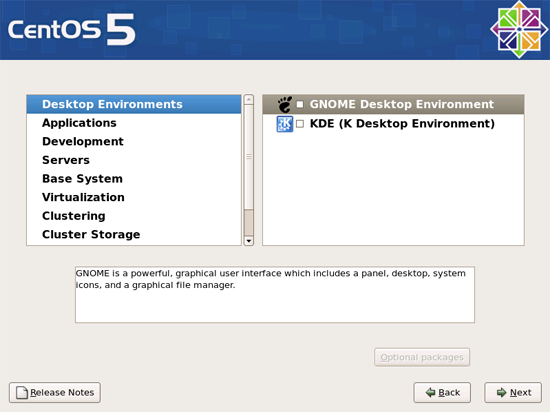
Once presented with the custom package selection, un-check/check the following:
Applications = Check only "Editors" and "Text Based Internet"
Development = Check only "Development Libraries" and "Development Tools"
Servers = Un-check everything
Base System = Check only "Base" (you can check Administration Tools and System Tools if you need them, but they are not necessary)
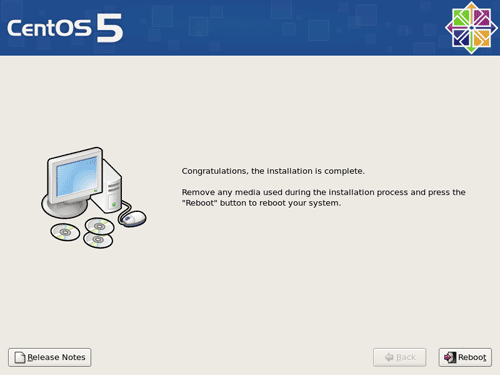
Now let the system finish the installation.
Step Four - Configuration
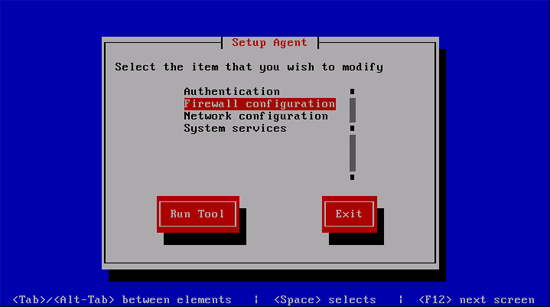
After the first reboot, the setup screen should appear. If not, log into the system and type "setup"
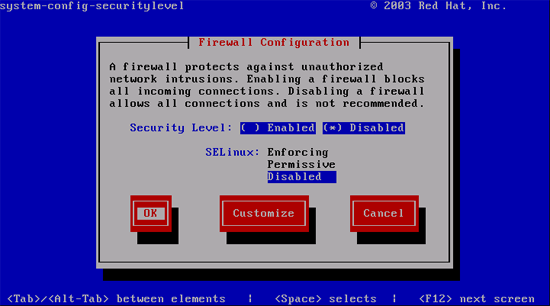
Select "Firewall Configuration" and set the "Security Level" and "SELinux" to "Disabled."
Next, we are going to disable a number of system services. Go back to the setup screen and select "System Services"
Un-Check:
apmd
bluetooth
cups
hidd
ip6tables
iptables
netfs
nfslock
pcscd
portmap
After disabling the services, select "Disable Now and On Boot", exit the setup tool, and log into the system if you haven't already.
- Screen is a simple program that allows you to run commands from a "Hosted" command line interface. This helps if you loose your connection to the server for any reason in that it enables you to resume (screen -r) right where you left off. Often times, I will start a large update/upgrade, leave it for the day, then come back and see where it's at later. Screen allows you to do that without having to be connected.
- Install Screen
yum install screen
- To start a screen session just type
screen
- If you get disconnected and need to resume your session of screen simply type
screen -r
Step Five - Installing ZoneMinder 1.25.0
First, we need to download files and prepare the system
- Add the RPM Forge repository to CentOS. This will allow the installation of a number of services/applications later without having to manually install them.
# For i386 CentOS 5.x run:
rpm -Uhv http://apt.sw.be/redhat/el5/en/i386/rpmforge/RPMS/rpmforge-release-0.3.6-1.el5.rf.i386.rpm

# For 64 bit CentOS 5.x run:
rpm -Uhv http://apt.sw.be/redhat/el5/en/x86_64/rpmforge/RPMS/rpmforge-release-0.3.6-1.el5.rf.x86_64.rpm
- Download the needed files, ZoneMinder 1.25.0 and the Cambozola addon
wget http://www2.zoneminder.com/downloads/ZoneMinder-1.25.0.tar.gz
wget http://www.zoneminder.com/sites/zoneminder.com/downloads/cambozola.jar
- Now let's install all the services and programs that will be needed (If you encounter any dependency errors using yum, try running yum clean all then re-try the install command(s).)
- tip: Copy/paste two lines at a time
yum -y install mysql mysql-server mysql-devel php php-gd php-mysql httpd gcc \
pcre-devel gd mod_ssl glib2-devel gcc-c++ ntp gnutls-devel ImageMagick

yum -y install libjpeg-devel perl-Archive-Tar perl-MIME-Lite perl-MIME-tools \
perl-Date-Manip perl-LWP-UserAgent-Determined

yum -y install perl-PHP-Serialization perl-Device-SerialPort perl-Archive-Zip perl-Sys-Mmap \
perl-Module-Load subversion git yasm bzip2 bzip2-devel bzip2-libs lbzip2
- Now let's update everything within the new CentOS install
yum -y update
- At this point, it might be useful to reboot your system. Oddly, sometimes things don't work right unless you reboot after all the updates
reboot -or- shutdown -r now
- After rebooting, log into your system
Install ffmpeg
- Now we need to make sure we use the latest "tested" version of "ffmpeg". This is the latest version of ffmpeg that the ZoneMinder developers have tested with. Download, compile and install ffmpeg:
git clone git://git.videolan.org/ffmpeg.git
cd ffmpeg
./configure --enable-gpl --enable-shared --enable-pthreads
make
- The following commands must be done as root
make install
make install-libs
edit /etc/ld.so.conf and add the line "/usr/local/lib"
ldconfig -v
- Next, run 'ffmpeg' from the command line. Make sure you do not get any errors:
ffmpeg
- If 'ffmpeg' runs correctly, you'll see something similar to this:
ffmpeg version N-32260-gaebb56e, Copyright (c) 2000-2011 the FFmpeg developers
  built on Aug 31 2011 21:41:49 with gcc 4.1.2 20080704 (Red Hat 4.1.2-50)
  configuration: --enable-shared --enable-swscale --enable-gpl --enable-pthreads
  libavutil    51. 14. 0 / 51. 14. 0
  libavcodec   53. 12. 0 / 53. 12. 0
  libavformat  53. 10. 0 / 53. 10. 0
  libavdevice  53.  3. 0 / 53.  3. 0
  libavfilter   2. 37. 0 /  2. 37. 0
  libswscale    2.  0. 0 /  2.  0. 0
  libpostproc  51.  2. 0 / 51.  2. 0
Hyper fast Audio and Video encoder
usage: ffmpeg [options] [[infile options] -i infile]... {[outfile options] outfile}...

Use -h to get full help or, even better, run 'man ffmpeg'
Enable services
- Turn everything on. These commands must be run as root.
 chkconfig httpd on
 chkconfig mysqld on
 chkconfig ntpd on
 service httpd start
 service mysqld start
 service ntpd start
Install Zoneminder
- Next, we need to extract the contents of the ZoneMinder "tar" file, then jump into its directory.
 cd /root/  # Or your work directory for this installation
 tar -zxvf ZoneMinder-1.25.0.tar.gz
 cd ZoneMinder-1.25.0
- Now we are going to configure ZoneMinder with some additional parameters. What is listed are the default CentOS directory locations.
./configure --with-webdir=/var/www/html/zm --with-cgidir=/var/www/cgi-bin
Note: It seems for Zoneminder to build with newer versions of ffmpeg, (certainly 0.6.3) you'll need to append CPPFLAGS="-D__STDC_CONSTANT_MACROS" to the end of the ./configure line thus:
./configure --with-webdir=/var/www/html/zm --with-cgidir=/var/www/cgi-bin --with-ffmpeg=/usr/local/share/ffmpeg CPPFLAGS="-D__STDC_CONSTANT_MACROS"
There is a section in the FAQ "When running configure, I get a lot of messages about not being able to compile the ffmpeg libraries" about this [[1]].
Worth mentioning here is the section in the FAQ under the heading "My load is too high, how can I reduce it?" [[2]]. This descibes how you can possibly reduce CPU load by half by changing the system's jpeg libraries and building Zoneminder with processor specific instructions. Since CentOS 6.4 CentOS now comes with libjpeg_turbo as the standard JPEG library leading to a more optimised Zoneminder.
By default ZM_DB_HOST=localhost, ZM_DB_NAME=zm, ZM_DB_USER=zmuser, and ZM_DB_PASS=zmpass.
- Change "zmuser" (if you want) with the user that you will use within MySQL to access the ZoneMinder database
- Change "zmpass" with the password you will be using with the "zmuser" account
So if you wish to change it, use a command like:
./configure --with-webdir=/var/www/html/zm --with-cgidir=/var/www/cgi-bin --with-webuser=apache --with-webgroup=apache ZM_DB_HOST=localhost ZM_DB_NAME=zm ZM_DB_USER=zmuser ZM_DB_PASS=zmpass
- if you get the configure "error zm requires libmysqlclient.a" with 64 bit CentOS add the following to the end of your configure statement
--with-extralibs="-L/usr/lib64 -L/usr/lib64/mysql"
e.g. For CentOS 5.6 64-bit with support for ffmpeg. The whole command must be executed on one line. Make sure to change the zmpass to a password that matches your installation.
./configure --with-webdir=/var/www/html/zm --with-cgidir=/var/www/cgi-bin --with-ffmpeg=/usr/local/share/ffmpeg --with-webuser=apache --with-webgroup=apache ZM_DB_HOST=localhost ZM_DB_NAME=zm ZM_DB_USER=zmuser ZM_DB_PASS=zmpass --with-extralibs="-L/usr/lib64 -L/usr/lib64/mysql" CXXFLAGS="-D__STDC_CONSTANT_MACROS"
- Run make and make install after running the configuration steps above.
make
# Run the next command as root
make install
Configure MySQL
- Need to add a password for the root user of MySQL
- Create the zm database
- Create the zm database user with permissions and password
mysql
mysql> SET PASSWORD FOR root@localhost=PASSWORD('new_root_password');
>Query OK, 0 rows affected (0.00 sec)
mysql> create database zm;
>Query OK, 1 row affected (0.01 sec)
mysql> CREATE USER 'your_zm_user'@'localhost' IDENTIFIED BY 'your_zm_password_from_above';
Query OK, 0 rows affected (0.01 sec)
mysql> grant CREATE, INSERT, SELECT, DELETE, UPDATE on zm.* to your_zm_user@localhost;
>Query OK, 0 rows affected (0.02 sec)
mysql> exit
>Bye
- Import the tables into the zm database
cd /root/ZoneMinder-1.25.0
mysql -u root -p zm < db/zm_create.sql
Finalize Installation of ZoneMinder
All remaining CLI commands need to be run as root.
- Make ZoneMinder startup automatically after a reboot
# from the ZoneMinder-1.25 source directory
cp scripts/zm /etc/init.d/
chmod +x /etc/init.d/zm
chkconfig zm on
- Add the Cambozola Java web interface
cp cambozola.jar /var/www/html/zm/
- Make sure you have permission to view it from apache:
chown apache:apache /var/www/html/zm/cambozola.jar
- Start ZoneMinder
service zm start
Note: You may get an error when you try to start Zoneminder using the 'zm' startup script as per this forum post: [[3]] . The reason for this was the default 'zm' startup script was formatted with DOS line endings. If you get the errors as detailed in the above post then the fix is to convert the 'zm' file to use UNIX style line endings. You can do this in the Vim text editor whilst editing the 'zm' file thus: ':set fileformat=unix' then save the file ':wq'. You can also use the utility dos2unix to convert the file.
- tick the box for support for the Cambozola addon within your ZoneMinder installation: http://ip-address/zm (Options->Images tab->OPT_CAMBOZOLA)
Now have fun and add your cameras to ZoneMinder knowing you now have a very stable and streamlined OS to run it on.
CentOS 6 Notes
The installation for CentOS 6 is pretty much the same. Download CentOS 6 minimal installation ISO (CentOS-6.0-i386-minimal.iso – 257MB). Burn to CD and install. We only want to be running in console text mode not GUI graphics mode. During installation configure network and tick to enable network adapter.
- Login as root and update the base install:
yum -y update
- Install required packages, other useful packages, and their dependencies
yum groupinstall core
yum groupinstall base
yum install gcc gcc-c++ wget bison mysql-devel mysql-server php php-mysql php-pear php-pear-DB php-mbstring \
nano tftp-server httpd make ncurses-devel libtermcap-devel sendmail sendmail-cf caching-nameserver \
sox newt-devel libxml2-devel libtiff-devel php-gd audiofile-devel gtk2-devel subversion nano kernel-devel \
bison-devel ncurses zlib zlib-devel openssl openssl-devel gnutls-devel php-process perl-Time-HiRes
Suggestion:
To remove various configure/make errors in Centos 6.2, you may also want to install:
bzip2-libs ffmpeg-devel ffmpeg-php perl-Net-SFTP-Foreign perl-Expect perl-LWPx-ParanoidAgent.x86_64
Now we continue from step four (4).
Installation of ZoneMinder
- In step five (5) the correct RPM Forge repository is:
# For i686 CentOS 6.x run:
rpm -Uhv http://apt.sw.be/redhat/el6/en/i386/rpmforge/RPMS/rpmforge-release-0.5.2-2.el6.rf.i686.rpm

# For 64 bit CentOS 6.x run:
rpm -Uhv http://apt.sw.be/redhat/el6/en/x86_64/rpmforge/RPMS/rpmforge-release-0.5.2-2.el6.rf.x86_64.rpm
- In step five (5) the command that seems to configure zoneminder correctly is:
CXXFLAGS=-D__STDC_CONSTANT_MACROS ./configure --with-webdir=/var/www/html/zm \
 --with-cgidir=/var/www/cgi-bin --with-webuser=apache --with-webgroup=apache \
ZM_DB_HOST=localhost ZM_DB_NAME=zm ZM_DB_USER=your_zm_user ZM_DB_PASS=your_zm_password ZM_SSL_LIB=openssl
Suggestion:
For Centos 6.2, I used the following configure string for success:
./configure --with-webdir=/var/www/html/zm --with-cgidir=/var/www/cgi-bin --with-webuser=apache --with-webgroup=apache ZM_DB_HOST=localhost ZM_DB_NAME=zm ZM_DB_USER=<zm user> ZM_DB_PASS=<zm user passwd> ZM_SSL_LIB=openssl --with-extralibs="-L/usr/lib64 -L/usr/lib64/mysql" --with-ffmpeg=/usr/share/ffmpeg CXXFLAGS="-D__STDC_CONSTANT_MACROS"
Troubleshooting FFmpeg Errors Building ZoneMinder
Using the git version of FFmpeg can cause the ZoneMinder make process to fail with unresolved symbols in ffmpeg. To remedy this, use version 0.6.5 of FFmpeg with the same configure instructions as the normal install above. FFmpeg 0.6.5: http://ffmpeg.org/releases/ffmpeg-0.6.5.tar.bz2
Troubleshooting Blank Page
If everything went ok but when accessing zoneminder's web page at http://localhost/zm, the page is blank this means that there is a problem with PHP short tags. Edit setting short_open_tag in php.ini (/etc/php.ini) and change it to On.
- Restart apache server with:
service httpd restart
and you should be up and running.
Trouble shooting full drive with CentOS 6
The default drive structure has chaned from that of CentOS 5 having the full drive allocated to the /root partition. CentOS 6 by default makes a logical volume 'LVM' of 10% your drives space for the /root partition and the remaining drive as the /home partion with the exception of the swap and boot partitions.
The will cause Zoneminder to fill the /root partition as the /var/www/html/zm/events directory is by default located here, you can use the system-config-lvm utility to re-adjust this partition balance if your system has been installed with the default partition structure.
It is best to install CentOS 6 with a custom partition layout that is the same as CentOS 5 structure, you can also if using a single physical had drive do with out the LVM drives and create an EXT4 /root partion along with the standard /boot and /swap partitions.
== '''P.S.''' == aspcicc@jumpy.it (Update: This does not appear to be required any more.)
Hi! and thanks for your guide.. i want to add a little correction that have made me crazy to resolve, when I poweroff or reboot system i obtain an error related to mysql database and i have understood that the problem was because mysqld is stopped before zoneminder to be more specific there isn't a link under rc0.d (halt) and rc6.d (reboot) to zoneminder that for this lack is simply killed by killall. To resolve this problem you need to add at the start of zm (under /etc/init.d) the line
' # chkconfig: 345 99 01 ' (without ' of course)
and then run chkconfig --level 345 zm on chkconfig --level 06 zm off
So the link to shutdown zm is created under rc0.d and rc6.d and zoneminder is started at the end of poweron and stopped at the beginning of the poweroff
For information about priority starting and stopping processes see: http://www.netadmintools.com/art94.html
Added Dependency: ImageMagick
Removed Dependency: perl-Time-HiRes, which causes a conflict with the default perl package.
Also, mysql seems to install with no password for the root user, and the zm DB create script creates the database on the fly, which means that the database create command needs to have the "-p zm" removed from the command line.
Could someone verify that this is correct, to make sure it's not just something I missed?
Thanks! terry@cnysupport.com
Struggling to get x264 and ffmpeg working? I used the latest SVN versions not the Centos packages. But I was getting
ffmpeg: error while loading shared libraries: libavdevice.so.53: cannot open shared object file: No such file or directory
I followed these instructions:
cd /etc/ld.so.conf.d
- add another file: custom-libs.conf
- inside, put :
/usr/local/lib
- save the file
- run ldconfig
ldconfig
BeeryGaz
Failed monitors or ZM refusing to start
A problem that took me some time to figure out on two installations was SElinux. SElinux stops Zoneminder from accessing some system parts or doing some functions so will cause various errors or simply drive you nuts trying to figure out.
Look at the following page on how to disable SElinux or use permissive mode.
http://www.centos.org/docs/5/html/5.2/Deployment_Guide/sec-sel-enable-disable.html
Some of the errors that I was getting with a fresh install on CentOS 6 was
2013-02-16 16:13:10.828590	zmwatch	14898	ERR	Can't open memory map file '/dev/shm/zm.mmap.1': No such file or directory	zmwatch.pl
2013-02-16 16:13:10.736988	zmfix	15317	ERR	Can't stat /dev/video0: Permission denied	zmfix.cpp
ZoneMinder 1.26.x
Zoneminder after a long period of none development is now being developed by the community, these notes are to try and help with the installation of the new release on CentOS 5 and CentOS 6. All testing has been done on a CentOS 6.4 fresh install server.
Cmake installation notes
Compiling of Zoneminder can now be done with the 'Cmake' command in replacement of the ./configure command this should automatically configure the build with the minimum of parameters. The 'Cmake' command at time of writing produced a partially working installation with the main files installed into /usr/local/bin/zoneminder and associated folders, different from the above guides.
The webfiles require to be linked via a zoneminder.conf file located with in the /disto/redhat directory inside the build directory that requires to be coped to the /etc/httpd/conf.d directory, this will need to be edited to the correct location of the webfiles and remove the local only command as indicated with in the file.
The Cmake install failed to use my BTTV capture card producing various errors with a potential solution given here
http://www.zoneminder.com/forums/viewtopic.php?f=30&t=21709
./configure compile
To install via the traditional ./configure method you first need to run the ./bootstrap.sh file to generate the required configure file, the install can then progress as the above installation guides.
This method has produced a fully working installation at time of writing.
pt_BR Instructions
Here is a good walkthrough install of zoneminder in CentOS using the rpm package method. It is intended to Portuguese (pt or pt_BR) audience.
http://dulimind.blogspot.com.br/2015/02/zoneminder-no-centos-6-metodo-facil-com.html
