Difference between revisions of "Add a user to ZoneMinder"
Stagecoach (talk | contribs) |
|||
| (16 intermediate revisions by 2 users not shown) | |||
| Line 1: | Line 1: | ||
=How to add a user to | --[[User:Stagecoach|stagecoach]] 15:27, 23 October 2010 (BST) | ||
== | |||
From the landing page navigate | Go back to the [[How_To|How To]] pages... | ||
=How to add a user to ZoneMinder= | |||
==Navigate to options menu== | |||
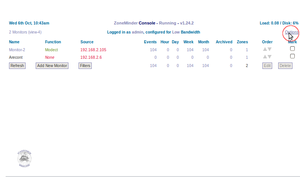
From the landing page navigate to the options menu. | |||
[[image:Landingpage.png|thumb|none|caption|How to get to the ZoneMinder main menu]] | |||
<br/> | <br/> | ||
==Navigate to the user settings== | |||
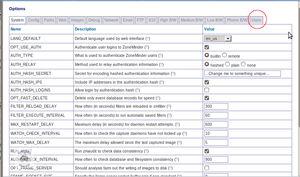
When you open up the options menu by default you are on the system settings tab, navigate to the users tab. <b>Note: This tab only appears when OPT_USE_AUTH is enabled in the 'System' section of options, and Zoneminder is restarted.</b> | |||
<br/> | <br/> | ||
[[image: Options_system.png|thumb|none|caption|How to get to the user settings]] | |||
<br/> | <br/> | ||
[[image: | |||
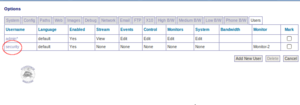
From this view you can see a list of current users and their permission settings. Click the add new user button to continue. | |||
[[image: Options_user.png|right|thumb|none|caption|How to find add user configuration]] | |||
<br/> | <br/> | ||
==Configure user settings== | |||
== | |||
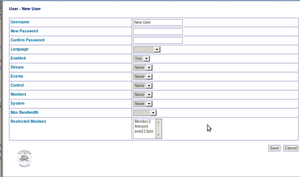
On this page we can add a new user with the username, password and permissions of our choice. | On this page we can add a new user with the username, password and permissions of our choice. | ||
In the restricted monitor field it is possible to restrict which cameras a user can view by clicking on them while holding down the shift key. When you have finished configuring the language/permissions and restricted monitors simply save the settings by clicking the save button. | |||
[[image: Options_adduser.png|none|thumb|caption|Add user configuration form]] | |||
In the restricted monitor field it is possible to restrict which cameras a user can view by clicking on them while holding down the shift key. When you have finished configuring the language/permissions and restricted monitors simply save the settings by clicking the save button. If this procedure was successful we will be able to see the new user under the "users" tab in the options. | |||
If this procedure was successful we will be able to see the new user under the "users" tab in the options. In this example i have added a user called 'security' restricted to view only 'monitor-2. Too make changes to a user simply click on their name and change settings as required. | |||
[[image: Options_userAdded.png]] | [[image: Options_userAdded.png|none|thumb|caption|Successfully added new user]] | ||
Latest revision as of 04:21, 6 June 2013
--stagecoach 15:27, 23 October 2010 (BST)
Go back to the How To pages...
How to add a user to ZoneMinder
From the landing page navigate to the options menu.
When you open up the options menu by default you are on the system settings tab, navigate to the users tab. Note: This tab only appears when OPT_USE_AUTH is enabled in the 'System' section of options, and Zoneminder is restarted.
From this view you can see a list of current users and their permission settings. Click the add new user button to continue.
Configure user settings
On this page we can add a new user with the username, password and permissions of our choice. In the restricted monitor field it is possible to restrict which cameras a user can view by clicking on them while holding down the shift key. When you have finished configuring the language/permissions and restricted monitors simply save the settings by clicking the save button.
If this procedure was successful we will be able to see the new user under the "users" tab in the options. In this example i have added a user called 'security' restricted to view only 'monitor-2. Too make changes to a user simply click on their name and change settings as required.


