Difference between revisions of "Using a dedicated Hard Drive"
| (44 intermediate revisions by 10 users not shown) | |||
| Line 1: | Line 1: | ||
On many installs you may wish to dedicate a hard drive or partition for Zoneminder events. There are many reasons why you may | With ZM, you may want to use a 2nd HDD dedicated for videos only, with no OS or db files on it. Or (in 1.32 and newer) you may want to add multiple HDDs, and spread out the cameras so that certain streams record to certain HDDs. | ||
==ZoneMinder 1.31 or Newer== | |||
Please follow the steps shown on our readthedocs site: | |||
http://zoneminder.readthedocs.io/en/latest/installationguide/dedicateddrive.html | |||
There are also video instructions here: | |||
https://youtu.be/ElXdmx9FsKQ | |||
===Web Console Instructions=== | |||
Here is a guide for users with 1.32.3 or newer, to add a storage device to ZM via the web portal. | |||
[[File:Console.png | 600px]] | |||
1. From the console, navigate to options. | |||
[[File:Options.png | 600px]] | |||
2. In options, navigate to storage. | |||
[[File:Storage_options.png | 600px]] | |||
3. Choose Add New Storage. | |||
[[File:Add_new_storage.png | 600px]] | |||
4. Configure paths appropriately. Here I have an external ext4 drive which is mounted at /video/. You may mount anywhere. It doesn't have to be /video/. Also, this was used for an outdoor ZM install which required an SSD. Typically you will want an HDD, not an SSD. For those curious, the scheme refers to how the files are named as they are saved in the directory. In old versions of ZM, there were a number of sub directories, (e.g. month 11 would be directory 11, day 30 would be directory 30 in folder 11, for 11/30, and so on, for year, day, hour, etc..). This option is kept for backwards compatibility, but also a newer simpler scheme is available called Medium. The default is medium and that will suffice for most. | |||
[[File:Console2.png | 600px]] | |||
5. Save and return to the console. Click the source tab to configure storage on each camera. Here we have the option of configuring where each camera can store its videos. This means you can have multiple HDDs, with multiple cameras, and split the storage across as many or as few HDDs as you wish. Camera 1 can record to HDD1, and Camera 2 can record to HDD2. Or you can have both Camera 1 and 2 on HDD1. | |||
[[File:Source.png | 600px]] | |||
6. In the source of '''each''' camera, configure where you want to save the videos. | |||
[[File:Permissions.png | 600px]] | |||
7. Make sure permissions are set correctly. The folder must allocate write and read permissions to www-data (debian) or apache (rhel). See the picture above for details. Note that some filesystems don't support all permissions, so it's recommended to use ext4, unless you know what you are doing. | |||
[[File:Console3.png | 600px]] | |||
8. We now need a filter, that will delete on our new storage area. Navigate to filters from the console. | |||
[[File:Filter.png | 600px]] | |||
9. Choose the PurgeWhenFull filter. Add '''storage area''' and the default will be equal to, which will work. Choose your new storage area from the drop down. You can test the filter now, by clicking on '''List Matches'''. Click save, to make the changes permanent. <small>Note that this filter is not necessary for the default storage area of /var/cache/zoneminder, and will in fact break the default storage area. So use only with external storage. Always test via 'list matches' to confirm your filter works as expected.</small> | |||
zmfilter has a log file in /var/log/zm/zmfilter.log if you've enabled these log files, and it can be tailed to view the filter in action. | |||
===Deleting the Default Storage Area=== | |||
Let's say you have added a new HDD (or multiple) and you don't intend to use the default storage area of /var/cache/zoneminder/events. Unfortunately, if you get a HDD failure, it will default to the 'default' storage, which means it may fill up your root hdd, which eventually leads to MySQL being unable to run, and breaks Zoneminder. To avoid this, you may want to delete the default /var/cache/zoneminder/events directory from the storage page. | |||
Note that if you already have events there, it won't allow you to check the checkbox (it will be greyed out, and hovering over it will tell you that any storage with events can't be deleted). To resolve this, you can manually go to /var/cache/zoneminder/events, delete all files there, then run zmaudit.pl --storage_id 1 which will search through the database, and erase any events that are not on the filesystem. After this you will be able to remove the default storage area through the web gui. | |||
==ZoneMinder 1.30.4 or Older== | |||
Note: Here is a reliable method to mount a drive or external share using systemd in Ubuntu or Debian: | |||
https://wiki.zoneminder.com/Common_Issues_with_Zoneminder_Installation_on_Ubuntu#Use_Systemd_to_Mount_Internal_Drive_or_NAS | |||
This can also be done in Centos or Red Hat distros... | |||
On many installs you may wish to dedicate a hard drive or partition for Zoneminder events. There are many reasons why you may want to change the storage location - security, data segregation, preventing encroachment onto OS partition by zoneminder etc. | |||
It's not terribly difficult to do, but may be non-obvious to the untaught so here's a brief guide. | It's not terribly difficult to do, but may be non-obvious to the untaught so here's a brief guide. | ||
Some commands here are based on Debian/Ubuntu installs | Some commands here are based on Debian/Ubuntu installs | ||
1. Become root or "sudo -s" to gain root privs. | 1. Become root or "sudo -s" to gain root privs. | ||
2. Stop Zoneminder. " | 2. Stop Zoneminder. "service zoneminder stop", "/usr/bin/zmpkg.pl stop", or "systemctl stop zoneminder" | ||
3. Mount your new partition onto the root filesystem, ensuring it is automatically remounted at boot time by editing /etc/fstab -- For the benefit of this guide, I'm calling my new partition /newdrive | 3. Mount your new partition onto the root filesystem, ensuring it is automatically remounted at boot time by editing /etc/fstab -- For the benefit of this guide, I'm calling my new partition /newdrive | ||
''Note this new partition can be a local drive, raid partition, lvm/md device, external NAS, SAN, NFS share or SMB share. The only condition is that the I/O throughput should be up to handling what Zoneminder will throw at it. For that speed reason, some favour non-journalled filesystems and accept the extra risk of data | ''Note this new partition can be a local drive, raid partition, lvm/md device, external NAS, SAN, NFS share or SMB share. The only condition is that the I/O throughput should be up to handling what Zoneminder will throw at it. For that speed reason, some favour non-journalled filesystems and accept the extra risk of data corruption'' | ||
4. Locate Zoneminder's "events" and "images" directories. In Debian, these are | 4. Locate Zoneminder's "events" and "images" directories. In Debian and Ubuntu, these are under /var/cache/zoneminder. In CentOS and Fedora, these are under /var/lib/zoneminder. | ||
If you wish to copy the data across, MOVE the events and images directories to /newdrive ''(Note this will take a long time on systems with many events). Also, DO NOT restart zoneminder | ''If you wish to copy the data across, MOVE the events and images directories to /newdrive/zoneminder ''(Note this will take a long time on systems with many events). Also, DO NOT restart zoneminder until this entire process is completed. Doing so will cause all your events to be lost!'' | ||
If you don't wish to preserve the data, it is MUCH faster to simply delete or rename the original events and images dirs and create new directories in /newdrive | If you don't wish to preserve the data, it is MUCH faster to simply delete or rename the original events and images dirs and create new directories in /newdrive/zoneminder. There is no need to remove the "orphaned" entries in the database, zmaudit will take care of those. | ||
Eg: | Eg: | ||
mkdir /newdrive/events | mkdir /newdrive/zoneminder/events | ||
mv / | mv /var/lib/zoneminder/events/* /var/lib/zoneminder/events_old/ | ||
-- or -- | |||
rm -rf /var/lib/zoneminder/events/ | |||
Add these lines in fstab to bind-mount an alternate location: | |||
/dev/sdX1 /newdrive ext3 defaults 0 2 | |||
/newdrive/zoneminder/images /var/cache/zoneminder/images none defaults,bind 0 2 | |||
/newdrive/zoneminder/events /var/cache/zoneminder/events none defaults,bind 0 2 | |||
/dev/sdX1 / | |||
/ | |||
/ | |||
or in some cases, | or in some cases, | ||
/ | /newdrive/zoneminder/images /var/lib/zoneminder/images none defaults,bind 0 2 | ||
/ | /newdrive/zoneminder/events /var/lib/zoneminder/events none defaults,bind 0 2 | ||
or if you have a separate partition for each: | or if you have a separate partition for each: | ||
| Line 47: | Line 103: | ||
/dev/sdX2 /var/cache/zoneminder/events ext3 defaults 0 2 | /dev/sdX2 /var/cache/zoneminder/events ext3 defaults 0 2 | ||
(Repeat for images) | (Repeat for images) | ||
5. Finally, | |||
5. Ensure ZoneMinder can write to the new destination by changing the owner and group to that of the web server user account. Debian based distros typically use "www-data" as the web server user account while many rpm based distros use "apache". | |||
chown -R apache:apache /newdrive/zoneminder | |||
You will also want to make sure the proper permissions are set in your /var folder, e.g. for debian | |||
chown -R www-data:www-data /var/cache/zoneminder/ | |||
6. Finally, mount /newdrive and test your fstab entries ("mount -a"). Restart zoneminder ( "service zoneminder start", "/usr/bin/zmpkg.pl start", or "systemctl start zoneminder") Monitor its operation and ensure new events are being created normally and are viewable. Zoneminder should also update the "Disk: %%" on its Console screen to reflect the disk space on its new partition. | |||
FREQUENTLY ASKED QUESTIONS | |||
Question: | |||
Why can't I just symlink the newdrive to the events folder? | |||
Answer: | |||
Because it does not work in every case. Many rpm and deb packages need the file folders set up exactly the way they were when the first zoneminder package was installed. Changing that around can cause package upgrades to fail, or worse you could lose all your data! | |||
Question: | |||
I noticed that there is an events folder under /usr/share/zoneminder/www, can I mount my dedicated hard drive or volume to that folder? | |||
Answer: | |||
This will not work in every case either and should be avoided. The events and images folders under /usr/share/zoneminder/www are actually symbolic links that point to the real folders under /var/lib/zoneminder (or /var/cache/zoneminder). Altering this in any way has the same affect as the answer to the first question. | |||
==Tips/Troubleshooting== | |||
===Creating Disk Images for Storage Areas=== | |||
See: https://forums.zoneminder.com/viewtopic.php?f=42&t=29297 | |||
===Permission Denied=== | |||
If you have multiple folder levels make sure permissions from the first all the way to the end storage folder allow www-data. | |||
===Eliminating Reserved Space for the HDD=== | |||
If you aren't entirely worried about losing the filesystem, you can eliminate the reserved space. Though it is debatable whether this is a wise decision or not. | |||
tune2fs -m 0 /dev/<hddhere> | |||
* https://forums.zoneminder.com/viewtopic.php?p=136620 | |||
* https://unix.stackexchange.com/questions/7950/reserved-space-for-root-on-a-filesystem-why | |||
Latest revision as of 18:12, 22 January 2025
With ZM, you may want to use a 2nd HDD dedicated for videos only, with no OS or db files on it. Or (in 1.32 and newer) you may want to add multiple HDDs, and spread out the cameras so that certain streams record to certain HDDs.
ZoneMinder 1.31 or Newer
Please follow the steps shown on our readthedocs site: http://zoneminder.readthedocs.io/en/latest/installationguide/dedicateddrive.html
There are also video instructions here: https://youtu.be/ElXdmx9FsKQ
Web Console Instructions
Here is a guide for users with 1.32.3 or newer, to add a storage device to ZM via the web portal.
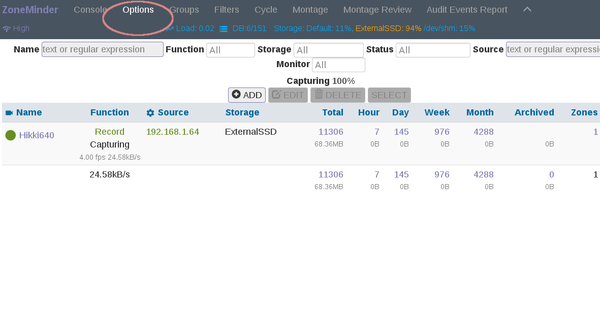
1. From the console, navigate to options.
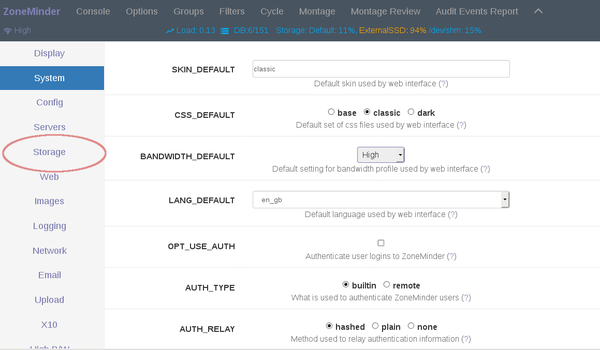
2. In options, navigate to storage.
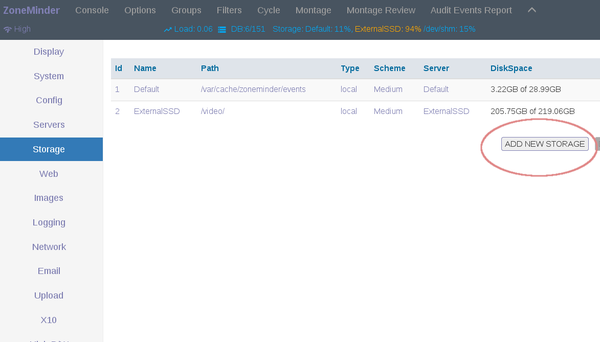
3. Choose Add New Storage.
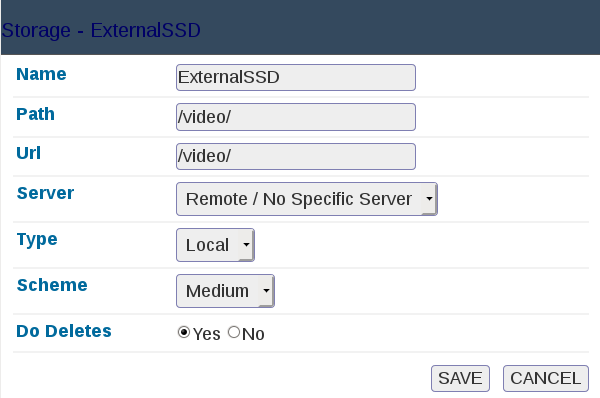
4. Configure paths appropriately. Here I have an external ext4 drive which is mounted at /video/. You may mount anywhere. It doesn't have to be /video/. Also, this was used for an outdoor ZM install which required an SSD. Typically you will want an HDD, not an SSD. For those curious, the scheme refers to how the files are named as they are saved in the directory. In old versions of ZM, there were a number of sub directories, (e.g. month 11 would be directory 11, day 30 would be directory 30 in folder 11, for 11/30, and so on, for year, day, hour, etc..). This option is kept for backwards compatibility, but also a newer simpler scheme is available called Medium. The default is medium and that will suffice for most.
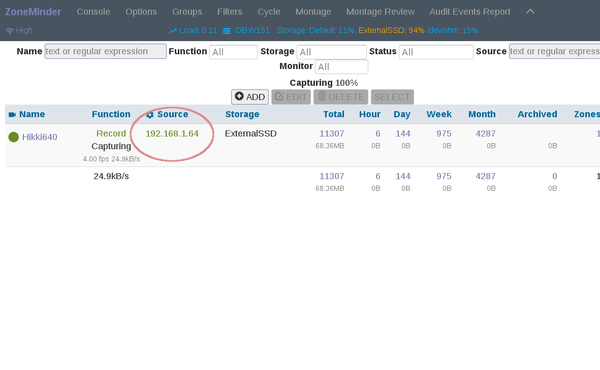
5. Save and return to the console. Click the source tab to configure storage on each camera. Here we have the option of configuring where each camera can store its videos. This means you can have multiple HDDs, with multiple cameras, and split the storage across as many or as few HDDs as you wish. Camera 1 can record to HDD1, and Camera 2 can record to HDD2. Or you can have both Camera 1 and 2 on HDD1.
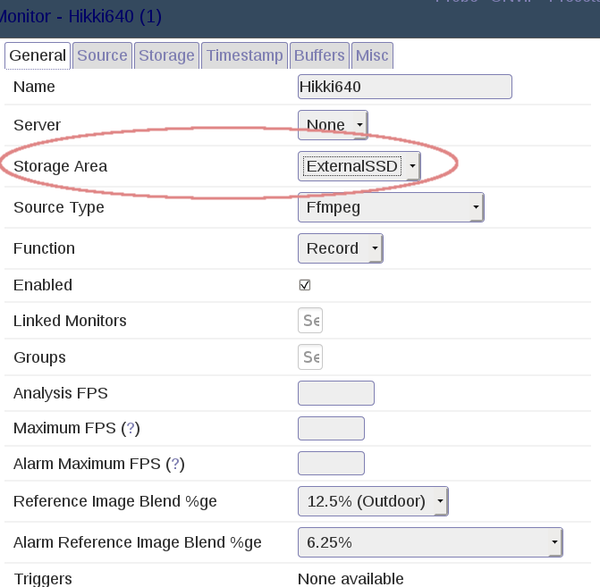
6. In the source of each camera, configure where you want to save the videos.
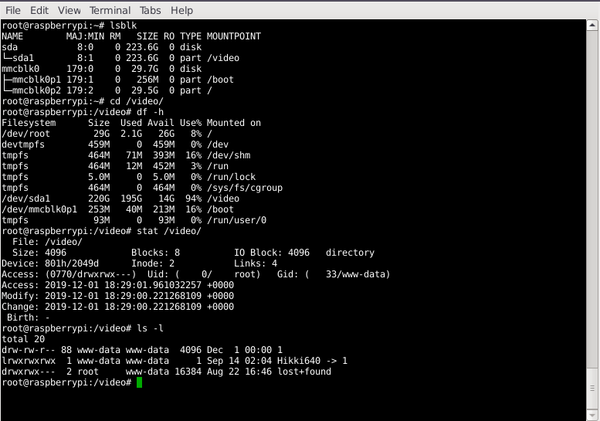
7. Make sure permissions are set correctly. The folder must allocate write and read permissions to www-data (debian) or apache (rhel). See the picture above for details. Note that some filesystems don't support all permissions, so it's recommended to use ext4, unless you know what you are doing.
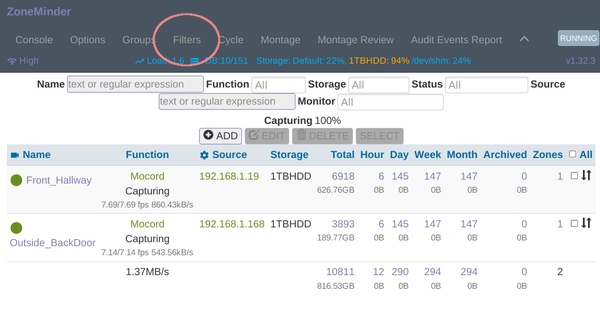
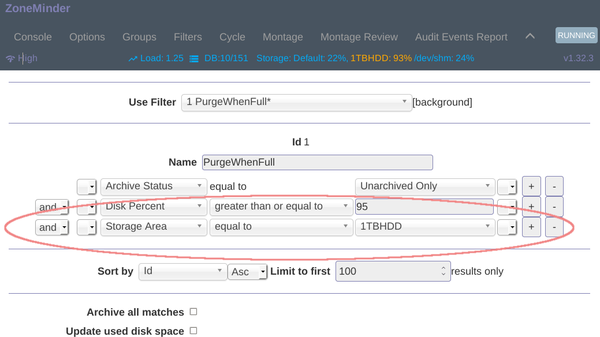
8. We now need a filter, that will delete on our new storage area. Navigate to filters from the console.
9. Choose the PurgeWhenFull filter. Add storage area and the default will be equal to, which will work. Choose your new storage area from the drop down. You can test the filter now, by clicking on List Matches. Click save, to make the changes permanent. Note that this filter is not necessary for the default storage area of /var/cache/zoneminder, and will in fact break the default storage area. So use only with external storage. Always test via 'list matches' to confirm your filter works as expected.
zmfilter has a log file in /var/log/zm/zmfilter.log if you've enabled these log files, and it can be tailed to view the filter in action.
Deleting the Default Storage Area
Let's say you have added a new HDD (or multiple) and you don't intend to use the default storage area of /var/cache/zoneminder/events. Unfortunately, if you get a HDD failure, it will default to the 'default' storage, which means it may fill up your root hdd, which eventually leads to MySQL being unable to run, and breaks Zoneminder. To avoid this, you may want to delete the default /var/cache/zoneminder/events directory from the storage page.
Note that if you already have events there, it won't allow you to check the checkbox (it will be greyed out, and hovering over it will tell you that any storage with events can't be deleted). To resolve this, you can manually go to /var/cache/zoneminder/events, delete all files there, then run zmaudit.pl --storage_id 1 which will search through the database, and erase any events that are not on the filesystem. After this you will be able to remove the default storage area through the web gui.
ZoneMinder 1.30.4 or Older
Note: Here is a reliable method to mount a drive or external share using systemd in Ubuntu or Debian: https://wiki.zoneminder.com/Common_Issues_with_Zoneminder_Installation_on_Ubuntu#Use_Systemd_to_Mount_Internal_Drive_or_NAS This can also be done in Centos or Red Hat distros...
On many installs you may wish to dedicate a hard drive or partition for Zoneminder events. There are many reasons why you may want to change the storage location - security, data segregation, preventing encroachment onto OS partition by zoneminder etc.
It's not terribly difficult to do, but may be non-obvious to the untaught so here's a brief guide.
Some commands here are based on Debian/Ubuntu installs
1. Become root or "sudo -s" to gain root privs.
2. Stop Zoneminder. "service zoneminder stop", "/usr/bin/zmpkg.pl stop", or "systemctl stop zoneminder"
3. Mount your new partition onto the root filesystem, ensuring it is automatically remounted at boot time by editing /etc/fstab -- For the benefit of this guide, I'm calling my new partition /newdrive
Note this new partition can be a local drive, raid partition, lvm/md device, external NAS, SAN, NFS share or SMB share. The only condition is that the I/O throughput should be up to handling what Zoneminder will throw at it. For that speed reason, some favour non-journalled filesystems and accept the extra risk of data corruption
4. Locate Zoneminder's "events" and "images" directories. In Debian and Ubuntu, these are under /var/cache/zoneminder. In CentOS and Fedora, these are under /var/lib/zoneminder.
If you wish to copy the data across, MOVE the events and images directories to /newdrive/zoneminder (Note this will take a long time on systems with many events). Also, DO NOT restart zoneminder until this entire process is completed. Doing so will cause all your events to be lost!
If you don't wish to preserve the data, it is MUCH faster to simply delete or rename the original events and images dirs and create new directories in /newdrive/zoneminder. There is no need to remove the "orphaned" entries in the database, zmaudit will take care of those.
Eg:
mkdir /newdrive/zoneminder/events
mv /var/lib/zoneminder/events/* /var/lib/zoneminder/events_old/ -- or -- rm -rf /var/lib/zoneminder/events/
Add these lines in fstab to bind-mount an alternate location:
/dev/sdX1 /newdrive ext3 defaults 0 2
/newdrive/zoneminder/images /var/cache/zoneminder/images none defaults,bind  0 2
/newdrive/zoneminder/events /var/cache/zoneminder/events none defaults,bind 0 2
or in some cases,
/newdrive/zoneminder/images /var/lib/zoneminder/images none defaults,bind  0 2
/newdrive/zoneminder/events /var/lib/zoneminder/events none defaults,bind 0 2
or if you have a separate partition for each:
/dev/sdX1 /var/cache/zoneminder/images ext3 defaults 0 2
/dev/sdX2 /var/cache/zoneminder/events ext3 defaults 0 2
(Repeat for images)
5. Ensure ZoneMinder can write to the new destination by changing the owner and group to that of the web server user account. Debian based distros typically use "www-data" as the web server user account while many rpm based distros use "apache".
chown -R apache:apache /newdrive/zoneminder
You will also want to make sure the proper permissions are set in your /var folder, e.g. for debian
chown -R www-data:www-data /var/cache/zoneminder/
6. Finally, mount /newdrive and test your fstab entries ("mount -a"). Restart zoneminder ( "service zoneminder start", "/usr/bin/zmpkg.pl start", or "systemctl start zoneminder") Monitor its operation and ensure new events are being created normally and are viewable. Zoneminder should also update the "Disk: %%" on its Console screen to reflect the disk space on its new partition.
FREQUENTLY ASKED QUESTIONS
Question: Why can't I just symlink the newdrive to the events folder? Answer: Because it does not work in every case. Many rpm and deb packages need the file folders set up exactly the way they were when the first zoneminder package was installed. Changing that around can cause package upgrades to fail, or worse you could lose all your data!
Question: I noticed that there is an events folder under /usr/share/zoneminder/www, can I mount my dedicated hard drive or volume to that folder? Answer: This will not work in every case either and should be avoided. The events and images folders under /usr/share/zoneminder/www are actually symbolic links that point to the real folders under /var/lib/zoneminder (or /var/cache/zoneminder). Altering this in any way has the same affect as the answer to the first question.
Tips/Troubleshooting
Creating Disk Images for Storage Areas
See: https://forums.zoneminder.com/viewtopic.php?f=42&t=29297
Permission Denied
If you have multiple folder levels make sure permissions from the first all the way to the end storage folder allow www-data.
Eliminating Reserved Space for the HDD
If you aren't entirely worried about losing the filesystem, you can eliminate the reserved space. Though it is debatable whether this is a wise decision or not.
tune2fs -m 0 /dev/<hddhere>
