CentOS
The intent of this walk through is to install a very base/bare bones installation of CentOS that will only run ZoneMinder. This would be for a dedicated ZoneMinder server with no GUI or any unnecessary services running. The reason for the very light-weight installation is so that the majority of system resources are available to ZoneMinder and not having to power the OS. With this installation, memory is reduced to around 140-160MB, and CPU usage is practically nonexistent. CentOS is very easy to install the base installation and doesn’t take too much time as long as you have some type of broadband connection. There are many ways to install CentOS, but this will only cover two because they are related.
All CLI operations/commands in this How-To are done as root in the user root's directory. The reasoning is that this system would be in a secure environment to begin with. However, if you need to add a user to run these services to better secure the system then you can, but keep in mind that some items must be ran as root.
CentOS 5.1 & ZoneMinder 1.23.3
Step One - Get CentOS
You can download the “.iso” file(s) for CentOS from www.centos.org
Alternatively download the net-install version of CentOS which is basically just the first CD.
Here is one location to download the net-install version:
Download i386: http://mirror.chpc.utah.edu/pub/centos/5.1/isos/i386/CentOS-5.1-i386-netinstall.iso
Mirrors List: http://www.centos.org/mirrors/
Step Two - Installation Source
Regardless of which method you use the next few steps are the same.
Begin by booting your system up with either cd/dvd.
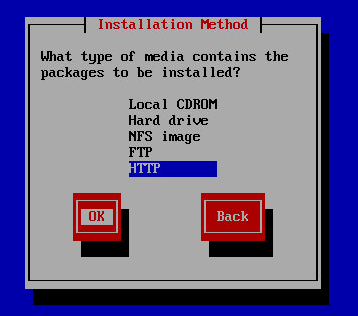
Choose the options that best fit your environment until you reach the “Installation Method”.
Choose “HTTP” ONLY if you are using the net-install method. If you are using the net-install method then enter:
Website Name: mirror.centos.org
CentOS Directory: /centos/5.1/os/i386
Step Three - Installation Packages
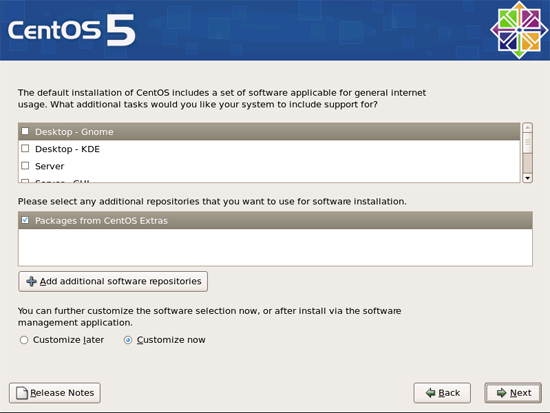
The first screen you want to un-check "Desktop - Gnome" and then check "Server" (not Server-GUI)
Then Make sure that you have "Customize now" selected at the bottom (do not check "Packages from CentOS Extras")
Then click "Next" to continue on
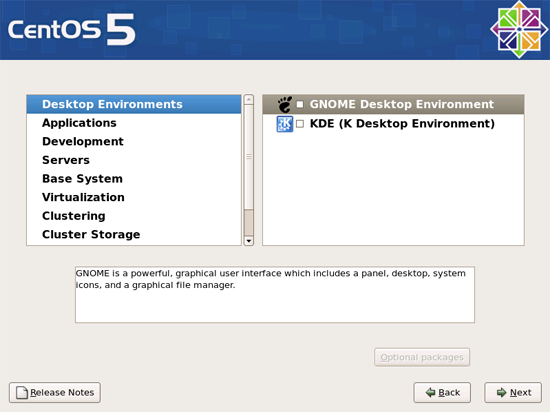
Once presented with the custom package selection you need to un-check/check the following:
Applications = Check only "Editors" and "Text Based Internet"
Development = Check only "Development Libraries" and "Development Tools"
Servers = Un-check everything
Base System = Check only "Base" (you can check Administration Tools and System Tools if you need them, but they are not necessary)
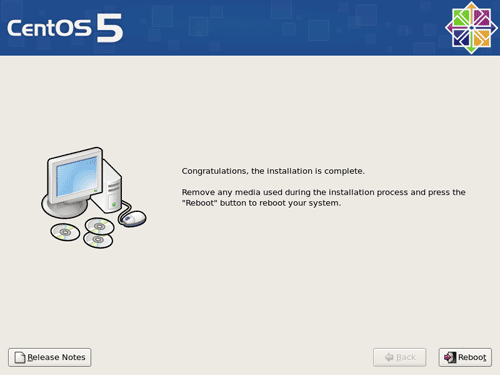
Now let the system finish installing
Step Four - Configuration
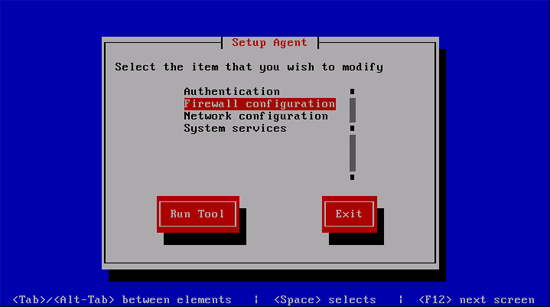
After the first reboot the setup screen should appear. If not then log into the system and type "setup"
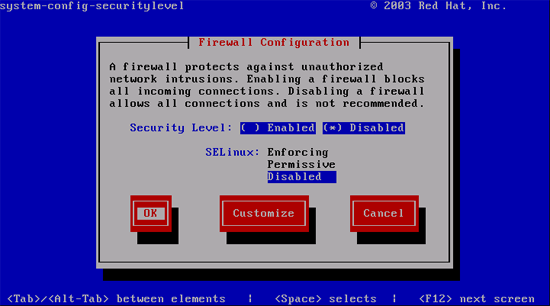
Go into the "Firewall Configuration" disable the Security Level, and Disable SELinux
Next we are going to disable a number of system services. Go back to the setup screen and go into "System Services"
Un-Check:
apmd
bluetooth
cups
hidd
ip6tables
iptables
netfs
nfslock
pcscd
portmap
After disabling the services then select "Disable Now and On Boot", then exit the setup tool, and log into the system if you haven't already.
- Screen is a simple program that allows you to run commands from a "Hosted" command line interface. This helps if you loose your connection to the server for any reason in that it allows you to resume (screen -r) right where you left off. Often times I will start a large update/upgrade, leave it for the day, then come back and see where it is at later. Screen allows you to do that without having to be always connected.
- Install Screen
yum install screen
- To start a screen session just type
screen
- If you get disconnected and need to resume your session of screen simply type
screen -r
Step Five - Installing ZoneMinder 1.23.3
First we need to download files and prepare the system
- Add the RPM Forge repository to CentOS. This will allow the installation of a number of services/applications later on without having to manually install them.
rpm -Uhv http://apt.sw.be/redhat/el5/en/i386/rpmforge/RPMS/rpmforge-release-0.3.6-1.el5.rf.i386.rpm
- Download the needed files ZoneMinder 1.23.3 and the Cambozola addon
wget http://www2.zoneminder.com/downloads/ZoneMinder-1.23.3.tar.gz
wget http://www.zoneminder.com/fileadmin/downloads/cambozola.jar
- Now let's install all the services and programs that will be needed
yum install mysql mysql-server mysql-devel php php-gd php-mysql httpd gcc pcre-devel gd mod_ssl glib2-devel gcc-c++ ntp gnutls-devel
yum install libjpeg-devel perl-Archive-Tar perl-MIME-Lite perl-MIME-tools perl-Date-Manip perl-Time-HiRes
yum install perl-LWP-UserAgent-Determined perl-PHP-Serialization perl-Device-SerialPort perl-Archive-Zip perl-Module-Load
- Now let's update everything within the new CentOS install
yum -y update
- At this point it might be useful to reboot your system. Oddly, sometimes things don't work right unless you reboot after all the updates
reboot -or- shutdown -r now
- After reboot log back into your system
- Now we need to make sure we use the lasted "tested" version of "ffmpeg". This is the latest version of ffmpeg that the ZoneMinder developers have tested with
svn checkout -r 11879 svn://svn.mplayerhq.hu/ffmpeg/trunk ffmpeg
cd ffmpeg/
./configure
make
make install
make install-libs
############################################################
NB: If you get an error at this point it may be due to the ../subdir.mak file being missing.
To resolve this go to http://www.ffmpeg.org/download.html and read the info on FFmpeg Git.
Remember to delete the entire ffmpeg tree in your working directory before downloading.
After installing git and downloading the entire source tree ffmpeg installs cleanly.
############################################################
- Turn everything on
chkconfig httpd on
chkconfig mysqld on
chkconfig ntpd on
service httpd start
service mysqld start
service ntpd start
- Next we need to extract the contents of the ZoneMinder "tar" file, and then jump into its directory
cd /root/
tar -zxvf ZoneMinder-1.23.3.tar.gz
cd ZoneMinder-1.23.3
- Now we are going to configure ZoneMinder with some added statements. What is listed are default CentOS directory placements.
./configure --with-webdir=/var/www/html/zm --with-cgidir=/var/www/cgi-bin
By default ZM_DB_HOST=localhost, ZM_DB_NAME=zm, ZM_DB_USER=zmuser, and ZM_DB_PASS=zmpass.
- Change "zmuser" (if you want) with the user that you will use within MySQL to access the ZoneMinder database
- Change "zmpass" with the password you will be using with the "zmuser" account
So if you wish to change it then use a command like:
./configure --with-webdir=/var/www/html/zm --with-cgidir=/var/www/cgi-bin --with-webuser=apache --with-webgroup=apache ZM_DB_HOST=localhost ZM_DB_NAME=zm ZM_DB_USER=zmuser ZM_DB_PASS=zmpass
- if you get the configure "error zm requires libmysqlclient.a" with centos x86 add the following to the end of you configure statement
--with-extralibs="-L/usr/lib64 -L/usr/lib64/mysql"
make
make install
- Need to add a password for the root user of MySQL
- Create the zm database
- Create the zm database user with permissions and password
mysql
mysql> SET PASSWORD FOR root@localhost=PASSWORD('new_root_password');
>Query OK, 0 rows affected (0.00 sec)
mysql> create database zm;
>Query OK, 1 row affected (0.01 sec)
mysql> grant CREATE, INSERT, SELECT, DELETE, UPDATE on zm.* to your_zm_user@localhost;
>Query OK, 0 rows affected (0.02 sec)
mysql> SET PASSWORD FOR your_zm_user@localhost=PASSWORD('your_zm_password_from_above');
>Query OK, 0 rows affected (0.25 sec)
mysql> exit
>Bye
- Import the tables into the zm database
cd ZoneMinder-1.23.3
mysql -u root -p < db/zm_create.sql zm
- Make it so that ZoneMinder will startup automatically when the system is rebooted
cp scripts/zm /etc/init.d/
chmod +x /etc/init.d/zm
chkconfig zm on
- Add the Cambozola Java web interface
cp cambozola.jar /var/www/html/zm/
- Start ZoneMinder
service zm start
- tick the box for support for the Cambozola addon within your ZoneMinder installation: http://ip-address/zm
Now have fun and add your cameras to ZoneMinder knowing that you now have a very stable and streamlined OS to run it on.
